DOMINATOR® Polymeric Sand is one of the easiest polymeric sands on the market to install, but sometimes folks still make time-consuming and costly mistakes. So we've collected some of the most common mistakes to help YOU avoid them.
The biggest mistake? Not reviewing the full How-To instructions and How-To video before tackling your project.

#1 - Damp Pavers or Joints
You must ensure that the pavers and joints are completely dry before installing polymeric sand. If there is any moisture present, it will cause the polymers to prematurely activate, leaving a haze on the surface or the sand won't set up properly. In a humid climate, wait until the morning dew burns off before starting to install the polymeric sand; similarly, don't miss the window and encounter the evening dew in your project installation.
#2 - Under-Watering or Over-Watering
In order to get the best bonding performance from the top of the joint to the very bottom, it is important to make sure you water your joints the correct amount of time using the "shower" setting on your hose attachment.
UNDER-WATERING causes the polymeric sand to simply form a "crust" on the top. If you only have a crust, you don't have a proper bond in the joints. Eventually, the crust will break away, eroding the joint. It also causes cracks and gaps, because the sand hasn't fully bonded the entire depth of the joint.
OVER-WATERING can lead to the polymers separating from the sand during activation (this is the "foam" you'll see when you've over-watered), reducing your bonding strength. In extreme cases, your sand won't harden fully.
Here is a handy guide for watering times:

#3 - Not Thoroughly Removing Excess Sand

Polymeric Sand is great for stabilizing your pavers because it bonds so well. This becomes a problem though, if it is activated and then allowed to dry ON TOP OF instead of between pavers. This problem can be made even worse and harder to fix if you then apply sealer on top of the sand-crusted pavers, enhancing the rough texture and haze. Of course, when applied properly though, sealer can create a beautiful finish to your polymeric sand project.
During installation, there are 2 critical times for you to remove the polymeric sand from the top of your pavers:
AFTER YOU'VE SWEPT YOUR SAND INTO YOUR JOINTS make sure to use a hard-bristled broom to get as much sand off of the top of your pavers as possible. If your pavers are highly textured or have an irregular surface, pay extra attention to removal at this stage.
DURING THE ACTIVATION PROCESS, while using the shower setting on the hose sprayer, you need to clean the top of the paver simultaneously while activating the polymeric sand in the joints. Use a pushing motion to ensure that you aren't leaving any sand on top of the pavers, while pushing it back into the adjacent joints. Any excess polymers and sand should be rinsed off of the project surface. Go over your pavers again with a leaf blower to blow any excess water and sand off of the surface of your pavers. Work in small areas to be sure you remove as much standing water and/or sand as possible. As before, pay extra attention if your pavers are highly textured or have an irregular surface that might "catch" sand and/or polymer dust.

#4 - Poor Drainage
Poor drainage conditions can sabotage your project. While DOMINATOR Polymeric Sand is one of the most forgiving sands on the market, you should still follow these guidelines:
Pavers should be installed on a base that allows water to drain through.
Pavers or stone should be set on crushed concrete, limestone, aggregate, etc, with bedding sand in between. In some cases, thin pavers can be installed over concrete, typically with bedding sand in between to provide a cushion effect and drainage. Installation guidelines vary throughout the country to account for varying soil limitations and climate conditions, as well as usage requirements (vehicular versus pedestrian). If polymeric sand is used in areas without proper drainage, then the water will expose the sand to prolonged periods of wetness and moisture, making it vulnerable to washout. In order for the polymers to harden, the water has to be able to escape.
Make sure your pavers have a natural or artificial border.
Your project area should slope slightly.
#5 - Overfilling Your Joints
This is a common and understandable mistake. You want to fill your joint all the way up to the top hoping for the best possible joint stabilization... more is better, right? Not in this case. In fact, it is important to make sure you leave about 1/8" from the top of your pavers. This is critical to help you avoid spill-over once you start watering your joints to activate the sand.
Further, overfilled joints will break down over time with traffic on the surface. This will not look good on your project. When the sand is 1/8" below the top of the surface, it allows for the best bonding and adherence of the paver joint.

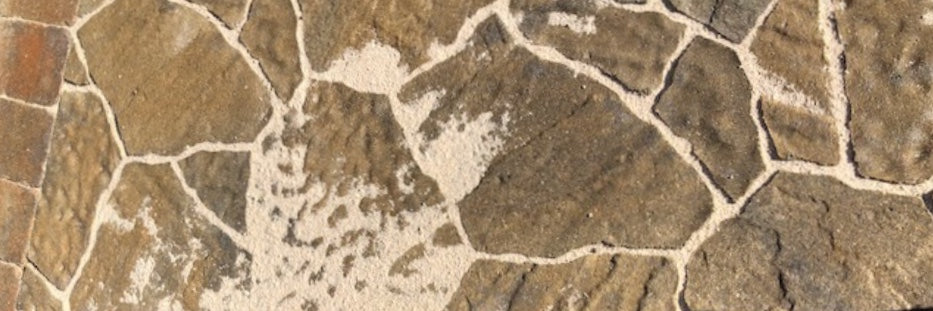
#6 - Too Narrow or Too Wide Joints
We recommend the joint width between your pavers be between 1/8th of an inch and 4 inches and the joint depth to be at least 1 inch. This allows you to get the best bonding performance from your polymeric sand.
Additionally, as you can see from the photo below, too-thin or extremely narrow joints can cause spill-over during the activation process; the tight channels don't allow water to flow and soak down to the bottom of the joints when showering with water. The sand is simply pushed out of the joints. This is why we don't recommend using polymeric sand on extremely narrow joints.
Similarly, too-wide joints can lead to washout, because they allow too much water flow during the activation process. Mortar should be used when joints are wider than 4" or depth of stones is less than 1".

The photo above shows a "haze" of sand that lifted onto the surface of the pavers during activation because of the too-tight joints. This mistake could have been avoided as the joints are less than 1/8", creating an unrecommended scenario for using polymeric sand.
Use our DOMINATOR® Polymeric Sand Calculator to help you determine how much sand is needed for your project!
Want some more tips? Here's a fun DOs & DON'Ts video!
Shop Now: DOMINATOR® Polymeric Sand
